Showing posts with label TARDIS. Show all posts

Sunday, 22 January 2017

New Doctor Who Figures Revealed

Character Options have revealed a new line of action figures, toys and re-releases as part of their Spring range that will be on display at London Toy Fair on the 24th January.

The figures featured were revealed last year but there are some new images to go along with them.

Character Options is proud to unveil a range of new Doctor Who figures and accessories for 2017. The new collection will be available from mid spring and is to be seen for the first time at London Toy Fair on Tuesday 24th January 2017.

Heading up the range is a number of articulated figures that will be perfect for collectors. Set in the classic 5.5 inch scaling each perfectly replicates some of the favourite characters, past and present, from the show.


The Tenth Doctor in Tuxedo, is packed in collectors packaging and not only comes with a figure and a Sonic Screwdriver but for fans is one of the most requested alternate outfits; perfect to recreate scenes from “Rise of Cybermen” and “Voyage of the Damned!”

Added to this is the favoured Tenth Doctor’s Sonic with lights and sounds. For those that did not collect it first time round now’s the time to add to your collection.


Fans of the Tenth Doctor will also be keen to get their hands on The Ninth and Tenth Doctor’s TARDIS Playset. With its motorised time rotor and pulsating lights this is the ultimate playset and has an illuminated console with six control buttons, removable floor panels and flip up console panel.


Another Figure in the series is the Twelfth Doctor, as played by Peter Capaldi, in his Ninth Season hoodie and checked trousers outfit. This item also includes a new head sculpt and his brand new Sonic Screwdriver just in time for Season Ten!


For serious collectors needing every variant, there is also the Twelfth Doctor in his Ninth Season Hoodie and Black Jumper outfit, a 5.5 inch figure not to be missed.


Finally, if you are looking for a Cyberman with a difference then make sure you stretch yourself for the new Cyberman 7-inch Stretch toy! Watch with wonder as the Doctors arch enemy is stretched many times his size only to return back to his original shape and size once he is let loose.

As of yet there are no images of the stretchy Cyberman but there is sure to be some from London Toy Fair next week. Currently the 10th Doctor in Tuxedo is the only figure available to pre-order from Forbidden Planet.

Tuesday, 4 November 2014

Big Chief Studios Update - 1:6 Scale 11th Doctor's TARDIS, 11th Doctor Stetson Portrait


Big Chief have revealed their upcoming 11th Doctor's TARDIS, complete with lights and interchangeable backdrops to reflect the series 5 and 7 console rooms. Limited to 1000 worldwide, the TARDIS is £269.99 and is due for release in June 2015. Pre-order here.


By paying in full or using one of Big Chief's payment plans, you will also receive the 11th Doctor's green trench coat from series 6.


In addition to this, Big Chief have also released an additional 11th Doctor portrait for their first figure, this time in his Stetson. At £34.99 this is the perfect addition to your trench coat that comes with the TARDIS! Pre-order here.


There have also been several updates for other products. The 1:6 scale First Doctor is now expected to ship early in January. The 1:6 Weeping Angel polystone statues are due towards the end of January, and finally the Fourth Doctor's new grinning portrait is expected in March. Just in time for my birthday!

More updates as they come!

Monday, 8 September 2014

To Fix a TARDIS - Part Three: The Fibreglass of Doom


Note: This post comes at the request of my father, who was thrilled to be featured in the last article. 

It may come as no surprise that I do not like fibreglass, given the fact the title of this article equates fiberglass and doom. I did not realise this until Huw and I began working on this part of the TARDIS' reconstruction. The fibres get everywhere, the resin is a sloppy mess of pungent fumes, and once the stuff has gone hard its edges are like razors. I've had fibreglass rash and my dad and I have been stabbed with tiny splinters more times than we can count. However, the TARDIS is now structurally more secure. All of the loose light boxes around the roof have been firmly attached and appear to be waterproof. Any small holes around the corners of the roof and across the base have been filled in an attempt to stop any leaks. Will it ever be totally waterproof? It's unlikely, but it's certainly a darn sight better than it ever was. In an attempt to stop any water seeping through the seams of the walls and the base, Huw devised a set of small pieces of sloped wood that would catch the rainwater and allow it to run off the base, rather than it collecting inside and flooding! 


In the last part I mentioned that I have been forced to make a few compromises with this project, one of which was a working door for the telephone. Well I'm pleased to say that we will now be having said door! After a lot of discussion we decided to take the plunge and cut out the panel from the door. If it doesn't work... well we'll work that out when it comes to it...


From the images attached you can see that the TARDIS is looking like Seagulls have used it for target practice. This is actually Polyfilla, and no, it's not being used to fill in holes. Instead, this has been applied in order to give the TARDIS a more battered concrete texture like the original prop designed by Peter Brachacki. Although the wooden appearance of the TARDIS looks nice in the new series, the Metropolitan Police Box was actually constructed from concrete and personally I think it adds to the idea that the TARDIS is well travelled and steered by a man who has no idea how to pilot it properly. 


Finally, the light! After countless internet searches we finally managed to acquire a light that actually does a decent job. It needs a few modifications before we can fix it to the roof, and the lamp housing needs a hole cut into the top to allow the sunlight to reach the solar panel. So there's still work to be done, but at least we know it works! 


As soon as we have sanded down the rough fibreglass sections, we'll be able to give it a new coat of paint. This Friday the windows will be fitted and the the new door attached. It's all coming to a close... Although I do have some ideas for the inside...

Tuesday, 26 August 2014

Big Chief Studios TARDIS - second teaser

A better look at Big Chief's 1:6 scale TARDIS. It's definitely a new series model, and it's looking lovely!

More info as it comes!


Tuesday, 19 August 2014

To Fix a TARDIS - Part Two


Compromise. That's what I've learned from embarking on this project: you must learn to compromise. If you look back to first part of this blog detailing the reconstruction of this TARDIS, you will see that I was full of ideas. Oh how I dreamed of accuracy! Of a 'Pull to Open' door that was fully working and featured a phone! Of windows and frames that were set on the inside rather than the outside, so we could actually have an accurate dip! Glass sign boxes that would illuminate and look wonderful at night! Well none of that is happening.

Piecing it back together again


The first issue we had to tackle was getting the TARDIS back up right, straight and solid. This was done with relative ease. A temporary frame was constructed to hold it all together and then later thick timber and large blocks were added to fix it all in place. The doors were reattached, along with the lock, and it was already beginning to look more like a TARDIS again. 

The 'Police Public Call Box' signs along the top of the roof were buggered. Well two of them were, the other two were okay. The sign above the door needed to be totally removed, unscrewed and reattached. The one left of that was hanging off one end and sagging at the other due to rotten wood. Oh, and there was a massive black spider living in it... In fact we've seen many spiders making their home out of the TARDIS and a lot of them great big buggers too. 


It became clear that trying to cut out the fibreglass to fit acrylic sheets in was a no-no. It was just too much messing around. You'd need to remake the entire housing for it to work, and we didn't want to mess around with that. The original lettering was peeling off, so we had new ones made by a sign manufacturers about five minutes up the road. The base has been painted with black gloss so that it'll look glass-like. The font's not quite the same as what it was, but it's near enough. Along with that a new door sin was made as was a St John Ambulance sign (provided by the helpful folk on the TARDIS Builders forum). These elements will be applied once the TARDIS is painted (Oxford Blue, if you're wondering!). 


We also scrapped the idea of having a working 'Pull to Open' door, simply because of the way the doors were moulded. I don't think our two guys working on it were keen to try and mess around with that, so unfortunately this will remain a facsimile. A new frame for that part has been made, and will be painted and attached at the end. 

Windows


The most annoying process has been the windows. New frames were made, dad sanded them down and painted them white, that was fine. Dad even used his newly found internet skills to find a website that would cut acrylic sheets to size. In order to achieve both a frosted and 'pebbled' effect on the acrylic, we bought rolls of plastic sheets that you cut to size and then apply to your acrylic. This was a complete pain in the arse. The bloody stuff doesn't really like sticking. It's not done with adhesive it's achieved by using moisture, which sadly doesn't like to cling on very well. Never the less, we coated one side of each of the eight acrylic sheets in the frosted stuff and then we cut the pebbled sheet into small rectangles that would be place in the bottom corners. Sadly, we couldn't find the exact pebbled effect so we had to compromise. Yes, there's that word again. However, the 'glass' now has a more accurate smooth and pebbled finish that it never used to. So thumbs up for that! 


The next issue was 'how do we fix the frames and the glass?', and the answer has not been a simple one. Originally the windows just 'sat' in the space, glued on to a lip of fibreglass that meant it sat on the outside. In reality the window frames sit on the inside so that you have a dip. As this was my chance to try and make it accurate, I wanted to try for the latter. A variety of options were presented to see how this could be achieved, but at the end of the day neither way would have looked right. It would have looked weird and ugly and I didn't really want that. So this was the next compromise. Now the windows are back on the outside, but this time they're bolted in and fixed with sealant. No wind is blowing them out. Ever.   

Illuminating... A test for fitting interior lights...

The Fibreglass of Doom


I officially loathe fibreglass. This is the final stage that needs to be completed before all the windows can be fixed and before we can get on and paint it. So why haven't we done it? Well living in the UK means that we have pretty shite weather, and rain is no good for using fibreglass. Unfortunately we have now hit a point where my fibreglassing man is not around until September! So here I was thinking we'd have a nice new waterproof TARDIS by the end of the month. Clearly it wasn't meant to be, but hopefully we can get that done as early into September as possible... Hopefully. 

TARDIS teased by Big Chief Studios

Big Chief Studios teased a new product in development that looks very much like 1:6 Scale TARDIS. Judging by the square window frames, it's most likely to be of the New Series variety.

More news as it develops.


Wednesday, 8 January 2014

To fix a TARDIS - Part One

I get asked a lot about my full sized TARDIS prop, which has recently come under some serious damage, and so I thought it would be nice to detail the prop's history, the changes we made and the changes I hope to make to it later this year.

Roughly ten years ago, my brother decided to buy a full sized replica TARDIS. He was at university, I was at secondary school. We had a replica before that, one that our late uncle had built from our old garden shed, it wasn't 100% accurate but it was a lot of fun. However, my brother decided that it would be nice to get something a bit more true to the screen, and so he purchased a Peter Cushing movie TARDIS from thisplanetearth ltd. Now you maybe wondering "Why on earth didn't you go for a TV prop?", sadly at the time they didn't manufacture them and so we settled with this. After all, it's still a TARDIS at the end of the day!

Original Metropolitan Police Box
The original Cushing movie prop was more accurate than any of the boxes used in the TV series as it was much closer to the dimensions, colour, etc of a real Metropolitan Police Box, and actually it still is to this day (say what you will about those films, they looked awesome... well maybe not the transvestite looking Thals). Our replica was brilliant! We loved it! It was made entirely of fibreglass with a few wooden supports to hold the walls and pillars to the base. The colour wasn't as dark as in the films and the light on top... didn't match the film, but it still looked brilliant. Even the St. John's Ambulance sticker didn't bother us. It looked the part! Now we opted to have the doors open inwards like the TV TARDIS, as opposed to outwards like a real Police Box/Cushing TARDIS. It's also worth noting at this point that the normally glass sections, such as the 'Police Public Call Box' signs, were not glass. Just solid fibreglass, so no chance of shining lights through it, and the little door to access the telephone did not open. It was all one solid mould.


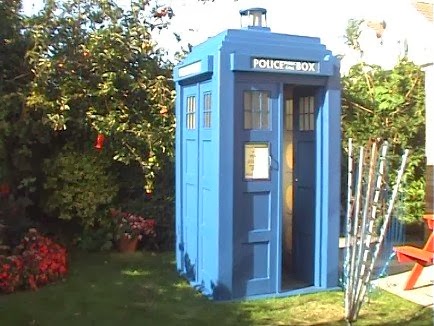
How our TARDIS originally looked
For a while all was good. It leaked, which was irritating because you got wet feet walking inside it. Then one windy day the roof nearly came off and blew away... not a good start. Thankfully our uncle did a bit of DIY cleverness on it and managed to get the roof to stay on firmly. As the years went on the windows and window frames would get blown out, they'd smash and have to be re-stuck, and remounted. The white window frames and St. John's Ambulance sign were removed or repainted in order to look more like the traditional TARDIS prop. The sun began to discolour the white door sign, which in turn began to crack from the distress caused by sunlight. It's easy to say "You should have put it indoors", but this thing is 9ft tall and our house is not that big.


By 2013 the yale lock had fallen off, so the doors were being held shut with string. The wood connecting the door to the pillar had rotted away and so the door was hanging off. The door sign was peeling off, the wooden frame surrounding that was rotting away, and the wooden supports that kept the whole thing together were disintegrating. It became clear that in 2014 some renovations would be required to get the TARDIS back up to scratch. By this point the original Hartnell/Cushing look of the TARDIS had returned to TV when it was revealed that Matt Smith's TARDIS had adopted the original colour scheme during filming in 2009. With this in mind I decided it would be nice to return to said colour scheme with our prop. (It should be noted that the real owner of this box had left home by this point, started a family and couldn't care less what became of a prop he spent £2000 on. Yeah, go figure).

Sadly in December 2013 massive storms hit the UK, and the South West got badly hit... and it took the TARDIS with it.

Yes, the grey walls and roundels were our addition
Not a pretty sight. The wind was so strong that it tore the fibreglass away from the rotting wooden supports, nearly all of the windows were blown out, the frames shattered, and in some cases the perspex glass smashed. The door handle on the left side had torn off with the wind, taking some of the wooden frame work with it. Screws had ripped through the fibreglass frame causing holes and tears... it looked as if this would be the end.

However, my father and I were able to get the TARDIS back upright and now it is back to looking like a TARDIS, albeit sans windows and with doors hanging off, but its not as bad as the above picture. We were able to get in touch with a friend of my brother's who believes he can get the TARDIS stable again. That's the first battle done, but huge aesthetic renovations are required to get it looking like a proper Type 40-TT Capsule. Now first and foremost is getting the thing stable again. Hopefully the guys working on it will get that done, possibly strengthen in better than before, and that will be it. We put it back together, tidy it up and leave it as was. However, if these guys are capable, I would like to add a few new elements to the box.


I want to return to the original look of the Cushing movie TARDIS. White window frames, St. John's Ambulance sign, etc. I want a darker colour scheme, as seen on the original Hartnell TARDIS below, and also that lovely concrete texture effect. Now our prop does have this, but only a little bit, nothing like the original Brachacki box used between 1963-1976. I've seen a guy do this online by using polyfilla to create such an effect, and it seems incredibly easy. If possible, it would be nice to secure the windows and try and match the clear and pebbled patches of the widows as seen on the Brachacki box as ours is simply pebbled. The reason for this design change was simply because Matt Smith's TARDIS went back to it, and it looks lovely! Now I mentioned earlier how our prop is more akin to a real Police Box, well in doing some digging it appeared the designers on Matt Smith's first series had the same intention.


How cool would that have been?! An accurate police box in the show at last. Alas, it didn't happen and we got that big blocky TARDIS (I prefer the slimmer look).

Moving on to the more complicated aspects... the door sign. Cut that out, fit a real little door on hinges so it's like the real thing. Sounds easy in theory, but probably not, but it's certainly something that I'll propose to the chaps working on it. Ideally (getting into lunatic territory here) I'd like to replace the 'Police Public Call Box' signs for real glass. I don't think this is feasible, but it would be great. If they were able to properly waterproof the damn thing, I'd try and get lights fitted so it looked like a proper police box. Not holding out any hope of that, but its certainly being discussed by me and my dad.

So that's the plan! Once work begins on the TARDIS I'll be posting regular/semi-regular updates on the process and detailing how well progress is going!